Installation
Prior to installation
Please pay attention to the points below before installing, updating or unintalling Alfresco Connector for Jira plugin.
- Your Alfresco must be structured and be ready for use in order to start using Alfresco Connector for Jira.
Please refer to Supported Platforms, System Requirements
To Install
- Select "Add-onsManage apps" from the "Administration" menu on the top right of Jira screen.
- Select "Manage add-onsApps" on the left hand panel of the add-on Apps screen.
- Type "Alfresco Connector for Jira" in the search box on the right of the screen and perform a search
- Click on "Buy now" or "Free Trial".
To Update
- Select "Add-onsManage apps" in the menu of the "administration" on the top right of Jira screen.
- Select "Manage add-onsapps" on the left hand panel of the Apps screen.
- Select "Alfresco Connector for Jira" on the right of the screen.
- Click on "Update". Make sure the installation succeeded.
To Uninstall
- Select "Add-onsManage apps" in the menu of "administration" on the top right of Jira screen.
- Select "Manage add-onsapps" on the left hand panel of the Apps screen.
- Select "Alfresco Connector for Jira" on the right of the screen.
- Click on "Uninstall".
- Click on "Continue".
- Verify that the uninstallation is completed.
To Configure License Key
- The license key needs to be entered in order to use the notification of Expiry Date.
- Select "Manage add-onsapps" in the Add-ons Apps screen.
- Select "Alfresco Connector for Jira" on the right of the screen.
- Enter a license key.
- Click on "Update".
Setting up
Setting up after Initial Installation
After the initial installation, mapping from Jira to Alfresco connection configuration and Alfresco folders is needed.
Setting up for connection "to"
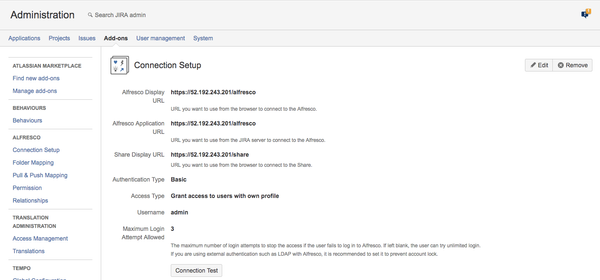
Editing Connection Setup
- Go to the connection screen by selecting "Add-onsManage apps", "Alfresco", then "Connection Setup" in "Administrator" menu.
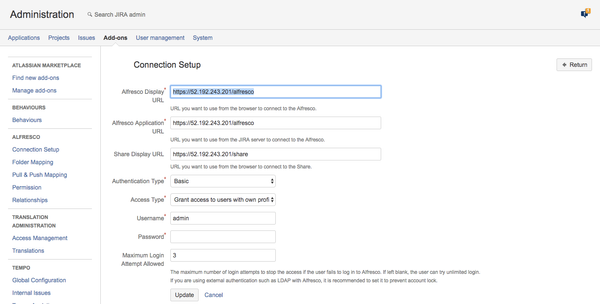
- Click on "Edit" and display the Edit screen
- Specify "Alfresco URL" for remote application connected from a browser, in "Alfresco Display URL".
- Specify "Alfresco URL" for remote application connected from a server, "Alfresco Application URL".
- Specify "Share URL" for remote application connected from a browser, in "Alfresco Share URL". This is not required, but please specify it when using the function of "12.Open Alfresco document detail window".
- Select "Basic" for "Authentication Type".
- Select "Grant access to users with admin profile." or "Grant access to users with own profile" for "Access type". Please refer to the Access Type for more information .
- Specify a user name for an Administrator user in "User Name".
- Specify a password for the Administrator user in "Password"
- Specify "Maximum Login Attempt Allowed" to the maximum number of login attempts to stop the connection when logging in to Alfresco fails. This is not required, but If Alfresco uses external authentication such as LDAP, it is recommended to set it to prevent account locking. Please see 21.Reset the login failure count for detail.
Status subtle true colour Green title Version 1.10.0+ - Click on "Update" button.
| Info |
|---|
About "Alfresco URL" and "Share URL" An URL used in an Alfresco default environment which is using the unchanged context path is as below.
|
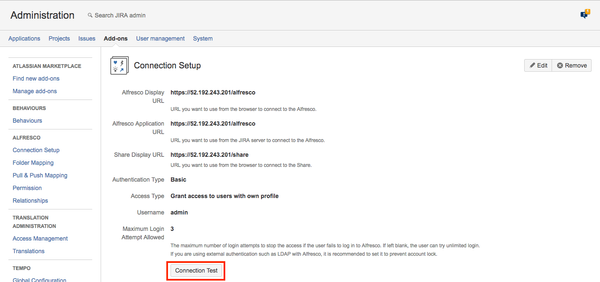
Confirming the current connection
- Go to Connection Setup screen selecting 'Administration>Add-ons>Alfresco>Connection >Manage apps>Alfresco>Connection Setup'.
- Click "Connection Test".
- The screen shows the result of connection test.
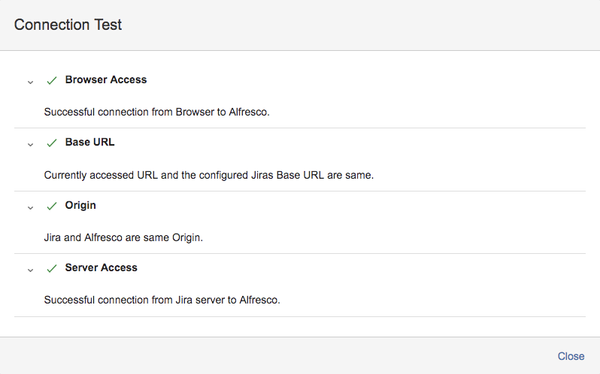
Connection Test dialog
Status subtle true colour Green title Version 1.8.0+
Status
"Connection Test" checks your configuration for known issues. These checks can return one of the following status:
| Icon | Mean |
|---|---|
| The check has passed successfully. No action is required. |
| The check has encountered an issue that may cause problems in the future. We recommend reviewing these messages, although remedial action may not be required. |
| The check has encountered an error, or th check has failed to perform. You should review these messages and take any appropriate remedial action. |
Check List
| Name | Icon | Message |
|---|---|---|
Browser Access |  | Successful connection from Browser to Alfresco. |
 | Authentication Fail.Please verify Username and Password. | |
| Failed to connection fro Browser to Alfresco.<br>Error: | |
Base URL | | Currently accessed URL and the configured Base URL are same. |
 | Currently accessed URL and the configured Base URL are different.Please verify the current Base URL in General configuration. | |
Origin | | Jira and Alfresco are same Origin. |
| Jira and Alfresco are different Origin, but Alfresco allows Cross Domain Requests from Jira. | |
| Jira and Alfresco are different Origin. (Boldface part below) To access Alfresco from Jira, you need to configure CORS for Alfresco. | |
Server Access | | Successful connection from Jira server to Alfresco. |
| Authentication Fail.Please verify Username and Password. | |
| Failed to connect from Jira server to Alfresco.Please verify Alfresco Application URL. |
Access Type
| Status | ||||||
|---|---|---|---|---|---|---|
|
Access type on Connection setup screen, you can select the following two options.
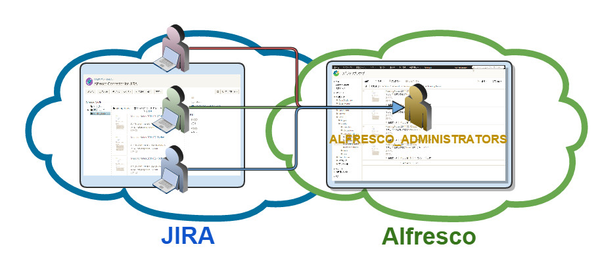
Grant access to users with admin profile
Select this option if you like Jira users to share the connection user to Alfresco set in connection setup screen.
Jira users can operate on Alfresco folders and files based on the shared connection user to Alfresco.
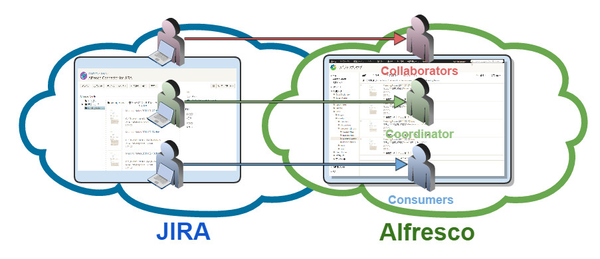
- Grant access to users with own profile
- Select this option if you like Jira users to use the own connection user to Alfresco set in user profile screen.
- Jira users can operate on Alfresco folders and files based on the own connection user to Alfresco.
- Setting conection user in the user profile screen, please refer to Connection user setting in the user profile screen.
Connection user setting in the user profile screen
Status subtle true colour Green title VERSION 1.3.0+
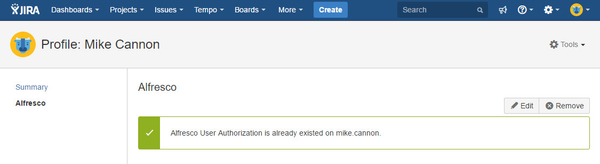
Editing connection user setting
- Go to Alfresco screen through 'Profile'.
- Click '+Edit' in top of right side screen and show editing screen.
- Register any 'Username', `Password` for connecting to Alfresco.
- Click 'Update'.
Removing connection user setting
- Go to Alfresco screen through 'Profile'.
- Click '+Remove' in top of right side screen and show editing screen.
- Click 'Remove'.
Folder Mapping

Pulic folders and Private folders
Public
- You can assign a single folder of Alfresco to Jira projects.
In 'Public', the folder you want to share in the project that has been specified path.
Private
- You can assign a single folder of Alfresco to Jira projects.
In 'Private', the folder available for each ticket in the specified path will be created automatically.
Addig Folder Mapping
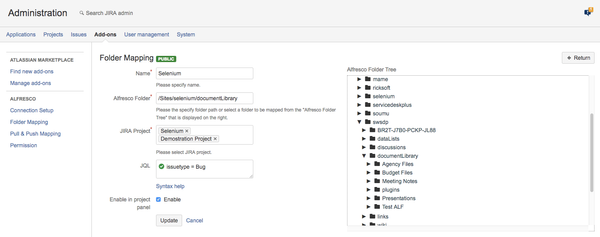
Public
- Go to Folder Mapping screen through 'Administration>Add-ons>Alfresco>Folder >Manage apps>Alfresco>Folder Mapping'.
- Click '+Add' in top of right side screen of 'Public' and show editing screen.
- Input any 'Name'.
- Choose the folder path of Alfresco from 'Alfresco Folder Tree' and the path set automatically to 'Alfresco Folder' or You can register to this input directly.
- Choose Jira projects which uses above Alfresco folder.
- Input 'JQL', If you want to narrow down the issue of displaying this folder. (optional)
Status subtle true colour Green title Version 1.8.0+ - Check 'Enable in Alfresco Project Panel', If you want to display this folder on the Alfresco Project Panel. (optional)
Status subtle true colour Green title Version 1.8.0+ - Click 'Update'.
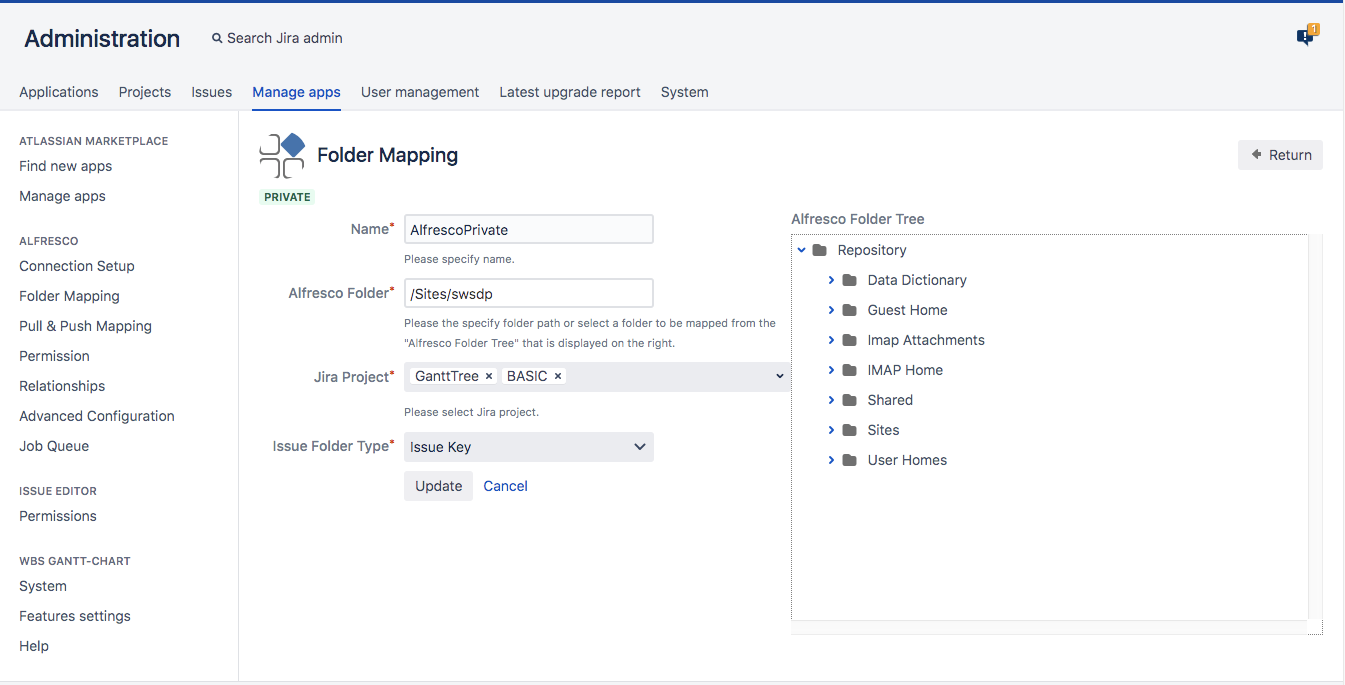
Private
- Go to Folder Mapping screen through 'Administration>Add-ons>Alfresco>Folder >Manage apps>Alfresco>Folder Mapping'.
- Click '+Add' in top of right side screen of 'Private' and show editing screen.
- Input any 'Name'.
- Choose the folder path of Alfresco from 'Alfresco Folder Tree' and the path set automatically to 'Alfresco Folder' or You can register to this input directly.
- Choose Jira projects which uses above Alfresco folder.
- Choose 'Issue Folder Type'.
Status subtle true colour Green title Version 1.13.0+ - Click 'Update'.
Editing Folder Mapping
- Go to Folder Mapping screen through 'Administration>Add-ons>Alfresco>Folder >Manage apps>Alfresco>Folder Mapping'.
- Click '+Add' in top of right side screen and show editing screen.
Removing Folder Mapping
- Go to Folder Mapping screen through 'Administration>Add-ons>Alfresco>Folder >Manage apps>Alfresco>Folder Mapping'.
- Click 'Remove' on preferred list of Alfresco file panel and show removing screen.
- Click 'Remove'.
Issue Folder Type
| Status | ||||||||
|---|---|---|---|---|---|---|---|---|
|
Folders created in the Alfresco folder in the private folder can be selected by two patterns: issue ID or issue Key. The folders created for each are as follows.
Issue ID
- / <Server ID> / <Project ID> / <Issue ID>
Issue Key
- /<Server ID> / <project key> / <issue number>
Pull & Push Mapping
| Status | ||||||
|---|---|---|---|---|---|---|
|
Jira administrators can define default mappings of Jira fields and Alfresco properties with 13.Synchronize Properties and Fields.
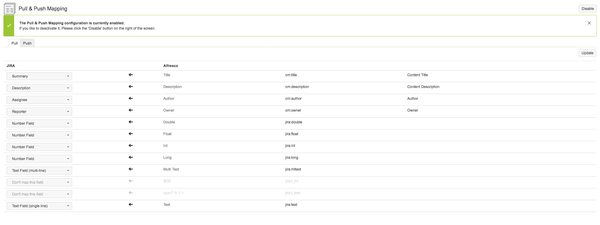
Editing Pull & Push Mapping setting
- Go to Permission setting screen selecting 'Administration > Add-ons Manage apps > Alfresco > Pull & Push Mapping'.
The properties available in Alfresco are displayed in the selection list when the setting screen is displayed. Please select the Jira field you want to map to each property from the selection list.
- Click "Update" button when the mapping is set up.
- If you have not activated the Pull & Push Mapping settings, click the "Enable" button. (It is invalidated immediately after plugin installation)
Permission
| Status | ||||||||
|---|---|---|---|---|---|---|---|---|
|
This permission setting allows Jira administrators to restrict what Jira users can do with 1.BrowsingFiles.
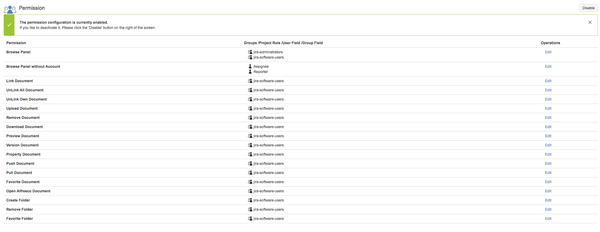
The Operations can be restricted are as follows.
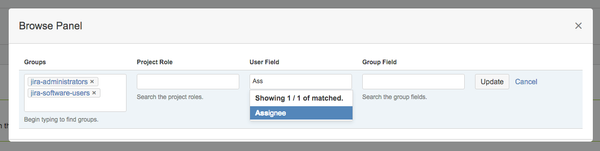
- Browse Panel
- Browse Panel without Account
Status subtle true colour Green title Version 1.7.0+ - Link Document
- UnLink All Document
- UnLink Document
- Upload Document
- Edit in Microsoft Office (Beta)
Status subtle true colour Green title Version 1.9.0+ - Edit Offline Document
Status subtle true colour Green title Version 1.9.0+ - Remove Document
- Download Document
- Preview Document
- Version Document
- Property Document
- Push Document
- Pull Document
- Favorite Document
- Open Alfresco Document
- Share Link Document
Status subtle true colour Green title Version 1.9.0+ - Create Folder
- Remove Folder
- Favorite Folder
The Conditions can be set for operation are as follows.
- Group
- Project Role
- User Field
- Assignee
- Reporter
- User Picker (single user)
- User Picker (multiple users)
- Group Field
- Group Picker (single group)
- Group Picker (multiple groups)
![]() User Field and Group Field are not included in the display and operation confitions of the Alfresco Project Panel.
User Field and Group Field are not included in the display and operation confitions of the Alfresco Project Panel.
Editing Permission setting
- Go to Permission setting screen selecting 'Administration > Add-ons Manage apps > Alfresco > Permission'.
Click the "Edit" link displayed in the table row of the permission you want to change to display the permission condition screen in a popup.
Add the conditions of group, project role, user field, group field and click "Update" button.
- If you have not activated the permission settings, click the "Enable" button. (It is invalidated immediately after plugin installation)
Relationships
| Status | ||||||||
|---|---|---|---|---|---|---|---|---|
|
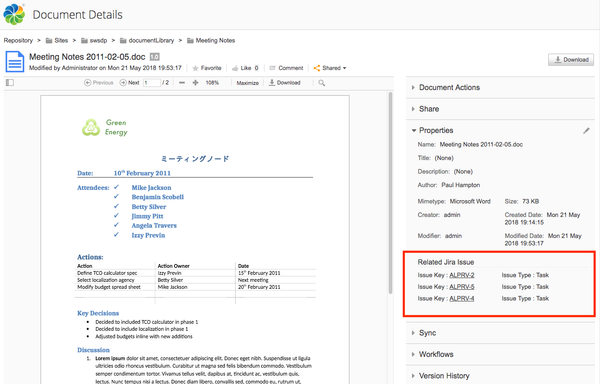
Until now, we could not track the linked Jira issues and Alfresco documents only by 8.Linking and Unlinking. Now, you can track them with "Related Jira Issue" will be displayed in Alfresco's "Document details" - "Properties". You can open the linked JIRA Issues from the Issue key link.
The document library displays an indicator icon in Alfresco document with Jira issue association.
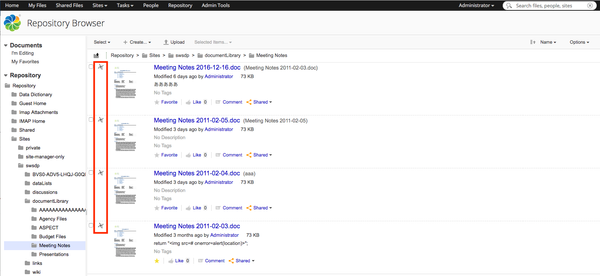
You can use this function by activating it with "Add-onsManage apps" - "ALFRESCO" - "Relationships". Please refer to the Install Guide for Alfresco Association plugin for details of the deployment steps as it is necessary content model.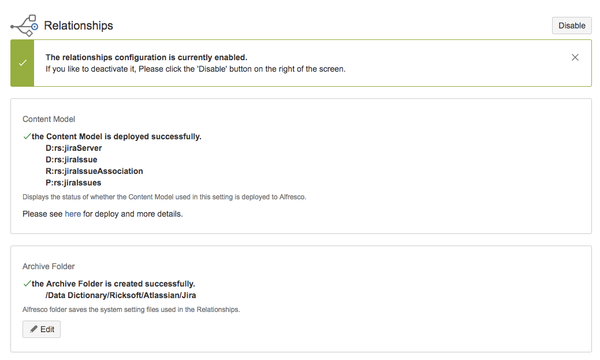
Archiving Jira Attachments
| Status | ||||||||
|---|---|---|---|---|---|---|---|---|
|
Files attached to Jira issues can be saved in Alfresco in the “post-function” of the workflow.
| Note |
|---|
|
Adding post-function
- Click "Add post function" on the workflow edit screen.
- Click “Save attachment in Alfresco”.
- Enter JQL if you want to narrow down the issues to perform post-operation to "JQL". (optional)
- Check “Delete saved attachments” if you want to delete attachments from Jira issues after saving attachments in Alfresco. (optional)
- Click “Add”.
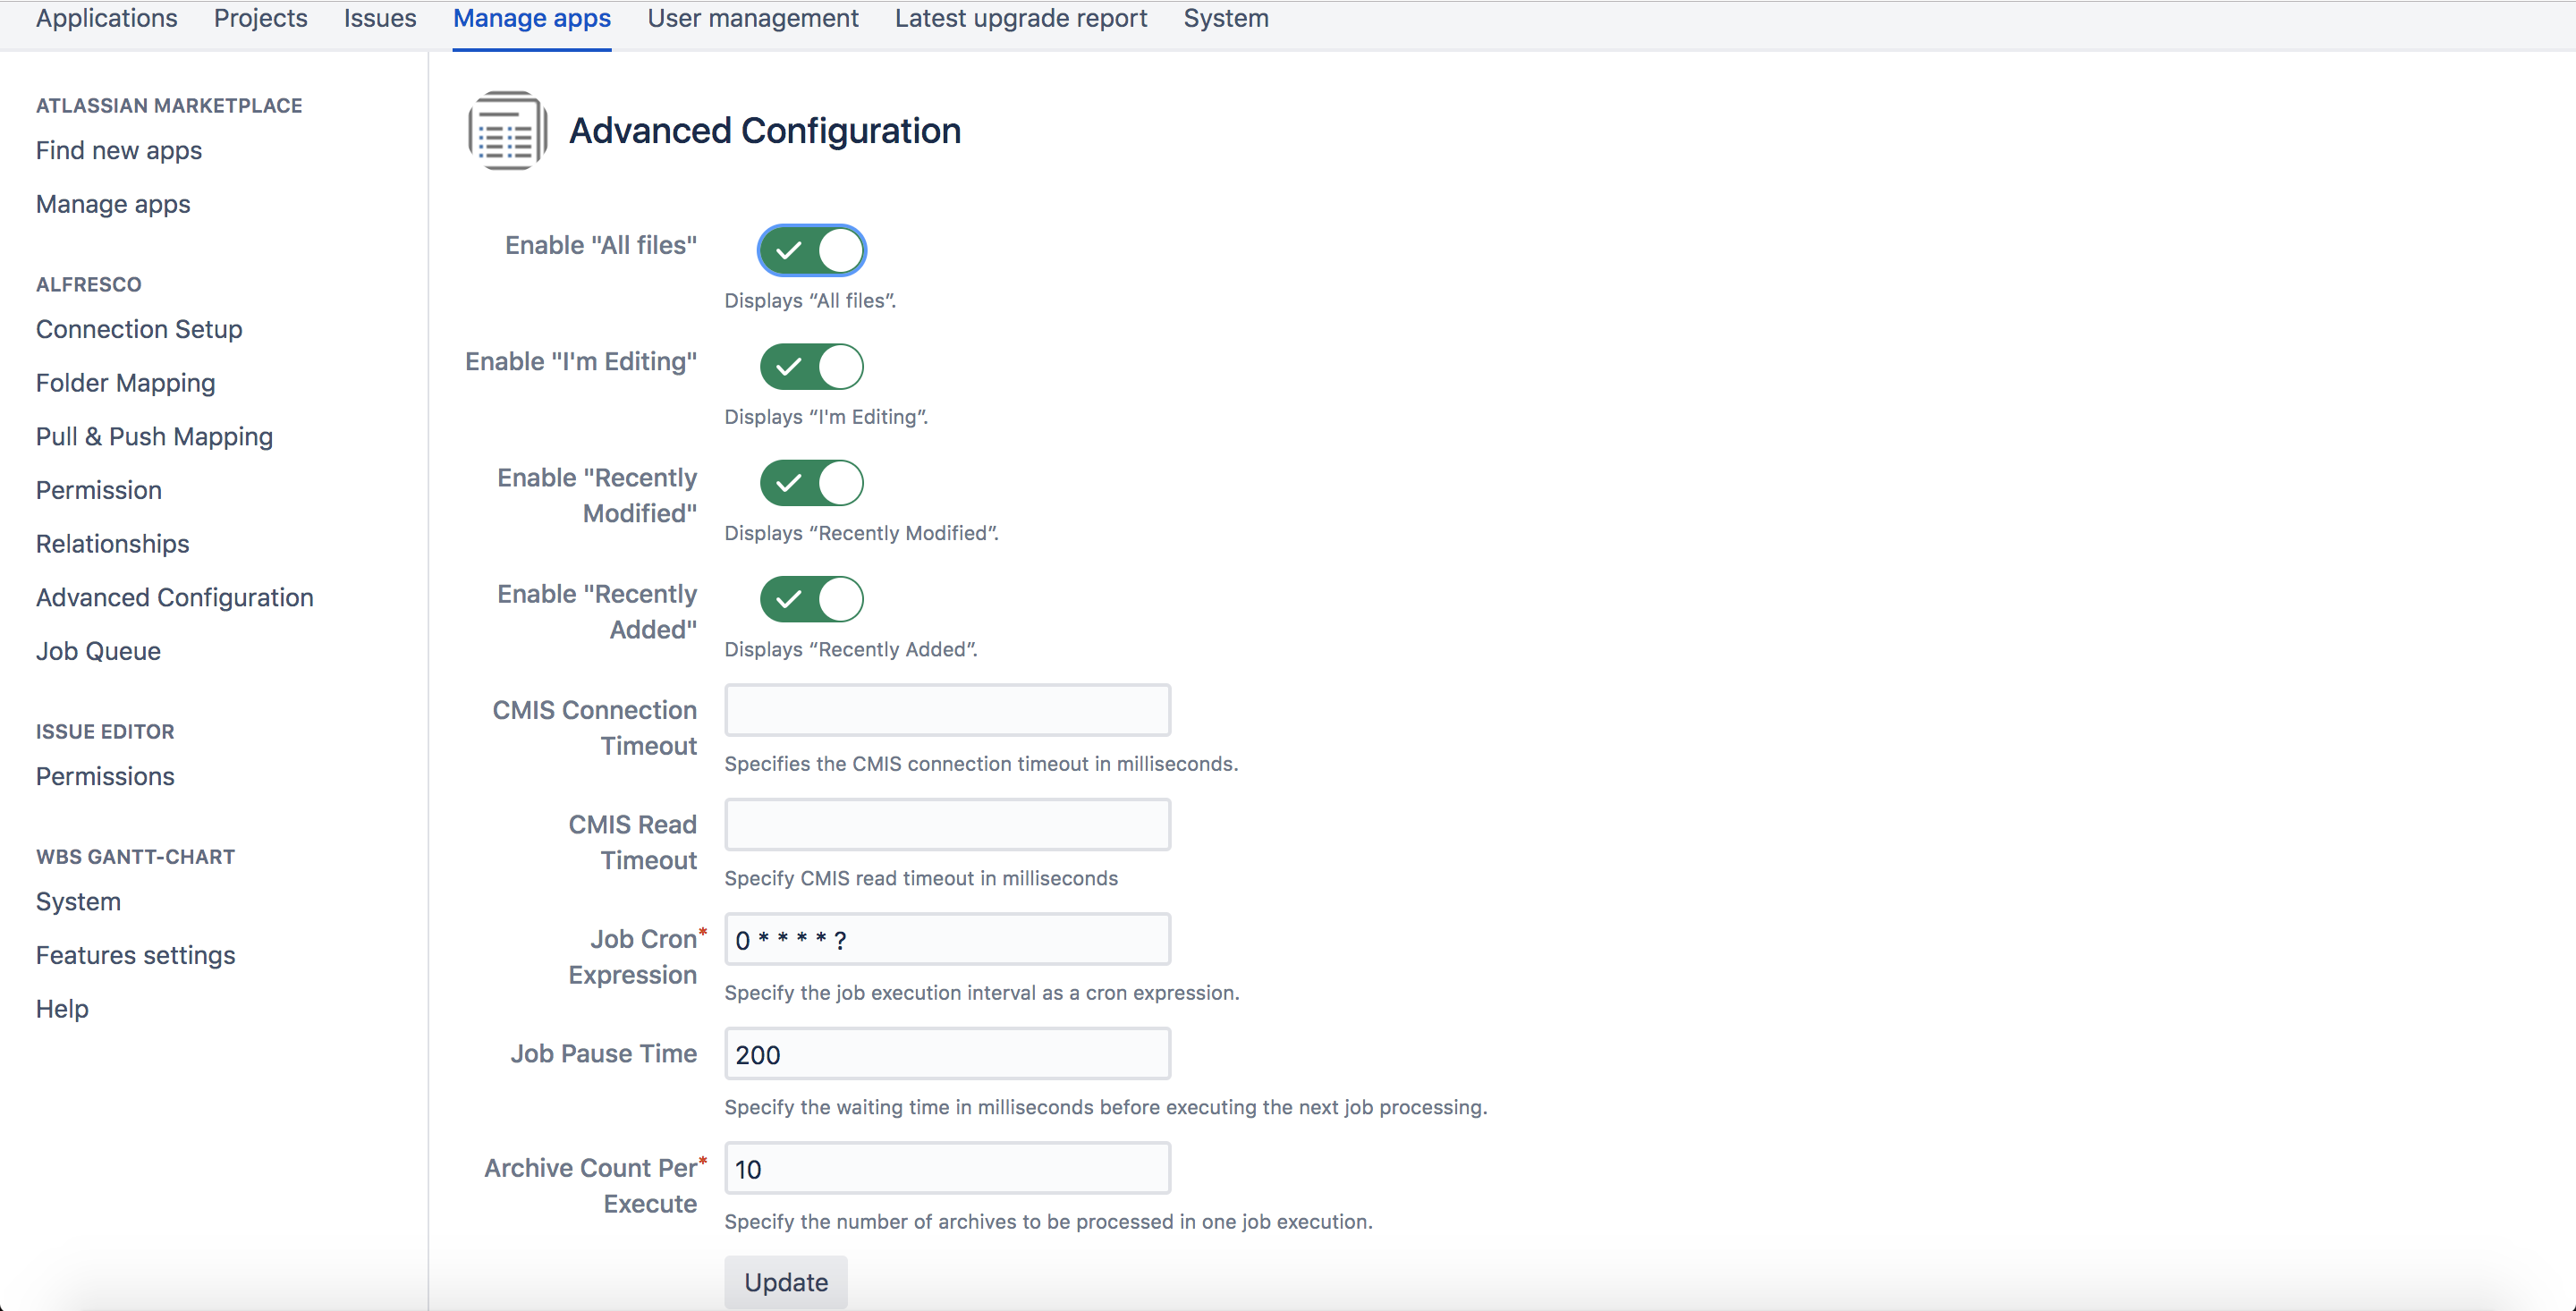
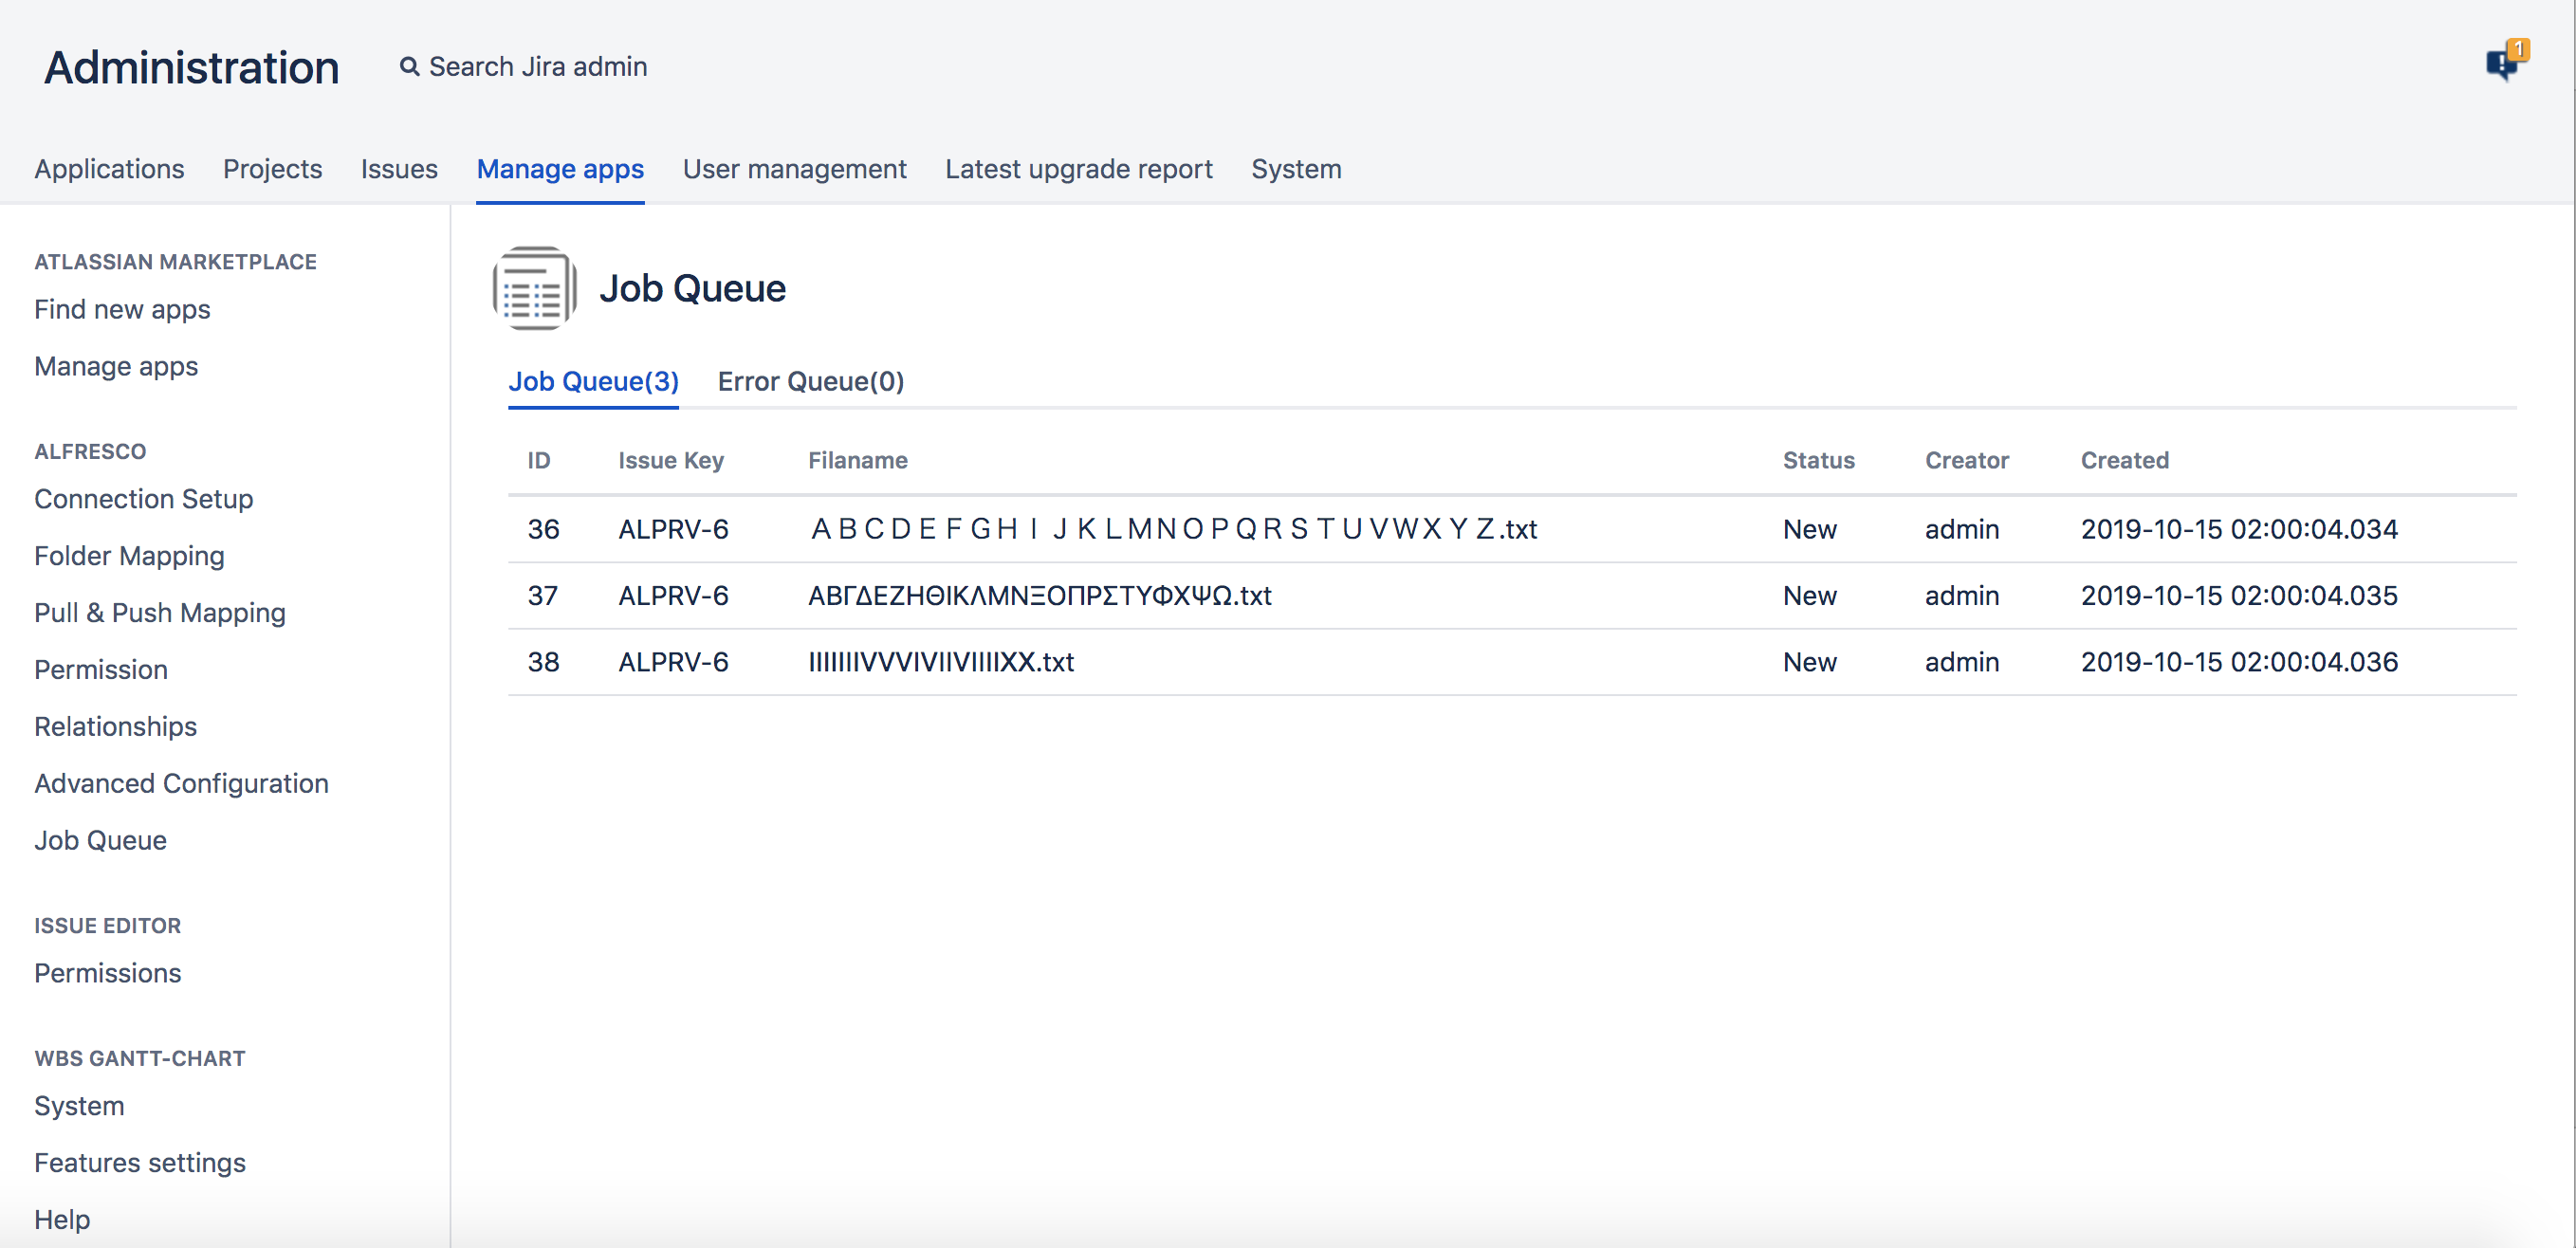
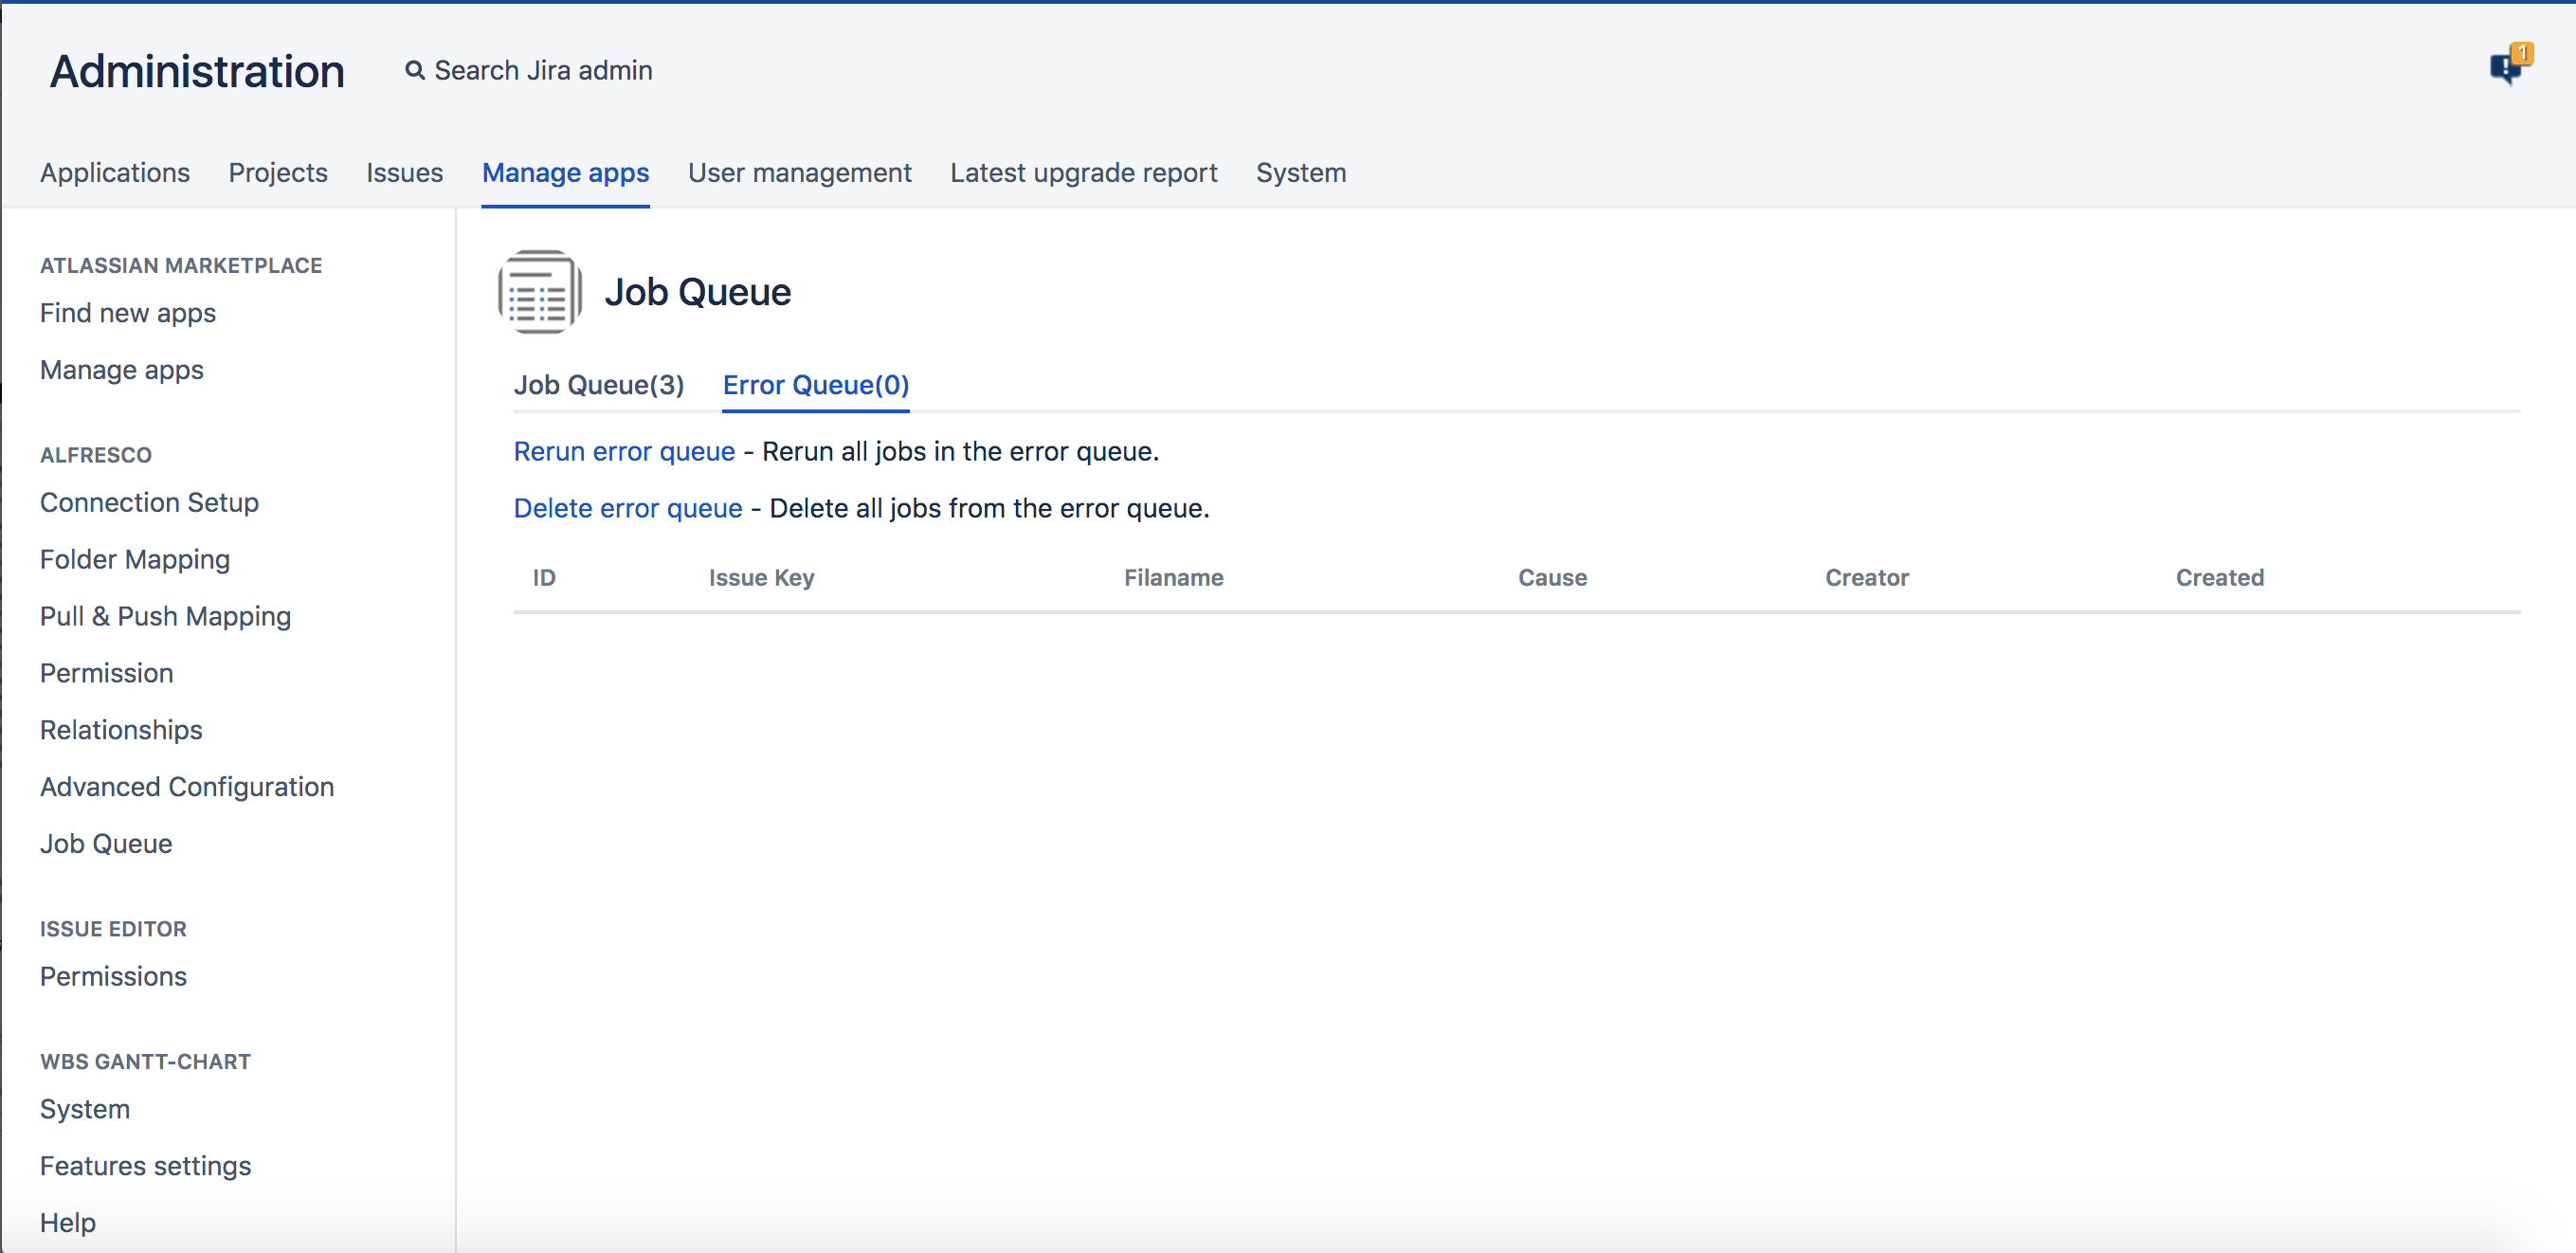
Job Queue
You can see the progress of a scheduled job in Job Queue and Error Queue. Go to this screen selecting 'Administration > Manage Apps > Alfresco > Job Queue'.
You can adjust the job parameters 'Job Cron Expression', 'Job Pause Time', 'Archive Count Per Execution' in Advanced Configuraiton. Go to this screen selecting 'Administration > Manage Apps > Alfresco > Advanced Configuration'.